|
 |
 |
Photography Tips for Winning eBay ListingsBy Steve Myers, Online Marketing Consultant Focus on ProfitsThey won't buy what they can't see. You've only got one chance to get the attention of an eBay buyer. Then they're gone. So what can you do to highlight your product and make it stand out? Show it off! At a retail store, you can pick an item up. You can see and feel the quality. Your eBay listing can only sell with two things:
eBay buyers need to be assured that the things you list are in good shape. They don't want a nasty surprise when the get the item. They need to see with their eyes what they're buying, so reassure them with images that show your product in the best light. Keep reading to learn step-by-step how to take great pictures that will increase your chances of selling your eBay products both more often and at a higher price. LightingWithout good lighting, they can't see a thing. I'm sure you've seen eBay listings with poor lighting. Without adequate lighting, you won't show details of your product. Potential buyers can't see if the item is clean. They can't see if it has tears, damage, or other defects. Think about when you go shopping at a retail store. What do you look for to decide if you should buy. Sure, you'll look at the price tag, but what else? If you're shopping for clothes, you will want to make sure there are no spots or stains on the item. You may check to make sure the zipper works on a pair of jeans or check for missing buttons on a shirt. Great lighting must be:
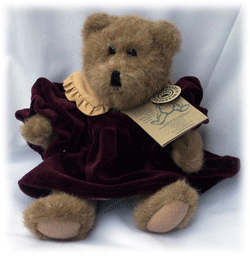
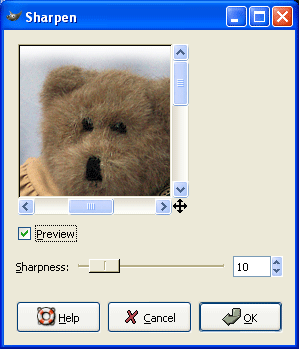
Bright LightingProbably the best source of lighting for many products is natural lighting. Especially for outdoor products such as camping equipment or yard tools, the sun provides the most natural light for these items. The reason the sun is such a good light source for auction items is it is bright enough, comes from more than one source, and it's the right color of light all in one. It may seem like the sun is a single light source, but lighting in an outdoor setting comes not only from the sun itself, but from lit up clouds and the sky itself. Multi-Source LightingWhy do we care if our item we want to list is lit from more than one source? When a single light source is used, it casts harsh shadows on the object. The parts in shadow you can't see well. Lighting an object from two sources of light (or more) means you can see all of it. What do I use for lighting when outdoor lighting isn't convenient? I picked up two halogen shop lights at my local Home Depot. Each one is free-standing, can have their height adjusted, and have two bulbs each (for a total of 4 light sources). They provide plenty of light. The bulbs are a nice, pure white as well. Proper Lighting ColorThere's only one light source I try to stay away from as much as possible. Fluorescent bulbs actually don't typically emit pure white light. Before I knew better, I'd take product pictures with this kind of light. The items would often look somewhat green or blue, depending on the kind of fluorescent bulb. You can actually buy fluorescent bulbs that are "natural" colored, but they'll cost more. Standard light bulbs tend to emit light with a blue or yellow hue. They work ok, but my recommendation is still natural lighting where possible, halogen light if not. My Dirty Little Lighting SecretIf you have Adobe Photoshop, you can easily adjust the color of the picture, its contrast, and even make it lighter. To correct your image, load it into Photoshop and click the Images selection at the top of the screen. In the drop down menu, click on Adjustments. Then within Adjustments, click on Auto Levels. You'll be amazed how this single adjustment will correct many image lighting problems. If you don't have Photoshop, you can get similar results with an excellent (and free!) image editor called "the Gimp." The Gimp isn't Photoshop, but it doesn't cost up to $800 either. :) Load your image into the Gimp and click on Tools at the top of the program. Then click on Color Tools in the drop down menu. Finally, click on Levels. In the Levels dialog box, click on the Auto button and then click on OK. No DistractionsOK, now that we've lit up our product, let's make it the star of the show. Effective eBay photos make it clear what you're selling. Make sure it's the only thing in the picture. You'll want a nice background that sets your product off nicely. I've seen some advice stating flatly that you should take all your pictures with a white background. If all the products you sell are black, I agree with that advice. You want to display your product with a background color that contrasts with your product. If I'm selling a white iPod, white's not the best background color for me to use. It won't stand out. Pick up a simple, plain white or light-colored sheet to use as a background for dark colored objects and a black or other dark color to put light colored items in front of. Also, keep in mind the color you'll display the image on. You'll want to select a background color that goes well with the look you use for your eBay listings. For a more complete discussion on how to design your eBay listings for greater impact, click the link below. Learn to Create a Unique Look for Your eBay Listings Make it Big Enough Since you're selling your item and not the sheet behind it, you want as little of the sheet to show as possible. Zoom in on the object or move the camera closer to the object so it takes up most of your camera's viewfinder. If you've already taken your picture, you can use a program like Photoshop or the Gimp to "crop" the image. Basically, you'll cut off all but a fairly small border around your item. When you upload your image to eBay, if it's larger than they display it, they will reduce its size to fit their format. If you have a lot of sheet showing around your item, the shrunk image will make your item appear very small. This is especially true for the gallery images on eBay. These gallery images are pretty small. Once your picture gets shrunk down to gallery size, if your item's too small to really see well, you likely wasted the extra listing fee to add a gallery image to your eBay listing. Multiple ViewpointsYou may want to take two or more pictures of your object. If you're selling a car, you'll want front and side pictures. Maybe you'll want to show off the car's interior. You get the picture. Just make sure you take enough views to show off your product well without paying a lot of extra by uploading views of your image that won't increase its chance to sell at a higher price. Make Your Item Look "Sharp"Another thing you can do to improve the look of your images is to "sharpen" them. Many digital cameras can take somewhat blurry images. Also, when you resize an image, it tends to get blurry. Here's an example of two pictures, the first prior to sharpening, the second after.
In Photoshop, to apply a sharpening filter to an image, do the following:
In the Gimp, do the following to sharpen an image:
To Sum It UpA picture's worth a thousand words. Potential buyers of your eBay products will be much more likely to buy your product when it's showcased with a good picture or two. It doesn't take much time to take great pictures. With free image editing software like the Gimp, it won't even cost you anything to crop, sharpen, and color correct your images. Follow the advice in this article to increase your chances of closing your eBay listing successfully. When eBay buyers see your products showcased in the best light, they'll often pay more. Make the most of your auctions with research!Try HammerTap FREE for 10 Days and remove the guesswork!Determining what works and what doesn't when it comes to your listings requires research. Anything less puts you at risk of not making the sale or not making as much as you could be on each sale. A research tool like HammerTap helps you bypass the costly trial and error process by quickly giving you the key information you need for profitable online auctions. Why not take HammerTap for a FREE test drive? We'll give you 10 days to put HammerTap to work for you. Use its power to determine:
As a bonus, you'll receive 10-lesson Power to Profit course to help you immediately see the effects research can have on your auctions. We'll also throw in selling tips from Industry Experts in our members-only Auctionography newsletter. You owe it to yourself to take the guesswork and risk out of your auctions. Try HammerTap free for 10 days. If you are not absolutely sure you'll increase your eBay profits by the $19.95 subscription price, you're free to cancel. It costs you nothing to prove to yourself there's a more profitable way to eBay. Click HERE to See How HammerTap Gives You the Power to Profit |
|||||||||