 |
 |
 |
Lesson 3On Target Every Time -- Accurate ResearchI hope you enjoyed feeling the power of using different search options in Lesson 2. I know youâre ready to dive into the results and learn how to power up your eBay listings, but there are a few words of warning I need to give you firstâaccurate research results mean money in your pocket, while inaccurate results mean youâre losing out on profits and sales. What does that mean, you ask? Well, letâs jump right in and Iâll tell you. Accurate Research Results Mean Money in Your PocketâInaccurate Results Mean Lost Profits!We spent a lot of time in Lesson 2 talking about the importance of narrowing in our search and making sure we were using the right keywords and search options. In this lesson, weâre going to take that a step further and examine how we can ensure that we have accurate research results. After all, whatâs the use of âfinding outâ whatâs likely to sell on eBay, how to close more sales, and how to make more money, if the results youâre relying on to make those critical decisions are skewed by irrelevant, inappropriate, or misleading eBay listings? Let me give you an example. Imagine that Iâm betting on the Superbowl; Iâve studied all the stats for the starting quarterbacks of both teams, and Iâm convinced that who will win is a no-brainer. But if I donât realize that one of the quarterbacks was injured in a car accident three days before the game and wonât be playing, what seemed quite obvious the day before will hardly be relevant on game day. I didnât ask the right question at the right time: âWhoâs playing?â Similarly, if weâre not asking the right questions at the right time with our eBay market research, our results are going to be just as meaningless as the stats I studied on the quarterback whoâs not playing. But if we put so much time and effort during the last lesson into learning the best way to run our search to make sure we had accurate results, what else can there be left to do, right? Letâs get back to selling Skullcandy earbuds. Go ahead and open up that saved report from Lesson 2. To open a saved report:
Iâm sure youâre wondering why Iâm making such a big deal about accurate research (after all itâs been a theme running throughout the last two lessons!). But trust me on this one. You do not want to run a research report, make decisions based on the information, and then realize that the information you were depending on wasnât relevant for your product. Thatâs how you lose money! So, letâs check our report for accuracy. Search TermsOur first stop on our quest for accuracy is the Search Terms bar in the Search Criteria chart in the Findings Window.
The keywords we included have a plus sign and those we excluded have a minus sign. You want to check your search terms and make sure there arenât any misspellings or typos. If youâve accidentally misspelled a word, itâs going to greatly affect your search results.
Total ListingsOnce weâve checked our search terms, we next turn our attention to the Total Listings number.
For
my search, I have 268 listings. (Remember, you probably have a
different number because the date range youâre searching is different
than mine.)We want to check the number of listings to ensure that weâre
looking at as many listings as possible. With 268, I know that
HammerTap has pulled all of the listings that match my search criteria
for the past 30 days. However, if my Total Listings was 500, (or
whatever number I had selected in the Product Search window), I would
want to go up to HammerTap only pulls listings until it reaches that limit youâve set. So, if you see the default number, there are probably more listings than are included in your results. And, remember, we want narrow results, but we also want to include as many listings as possible. The Listings WindowOur final and most important step is the Listings Window. Using this window to check for accuracy is probably the #1 most important thing you can do to make sure you have good results. Hereâs the Listings Window for my search. There is a green button at the bottom of your screen that says "Listings". Click on this to see a screen like the one below:
This window displays all 268 listings that my search includes. I can see their listing titles, their starting and ending price information, how many bids they received, and a ton of other information on each of them. This report is invaluable as I make sure Iâm only looking listings that match my product. Scanning the listing titles will usually give you a pretty good idea on whether or not a product matches your query. However, one of the most effective ways to clean up your research is to check for outliers. âOutliersâ is a statistical term that means an extreme high or an extreme low, and since most of the conclusions HammerTap presents for us are based on averages, outliers can skew our data and quickly make our results meaningless. To check for outliers, we sort the data by the High Bid column. Here are the first three listings from my reportâ¦
Weâre going to look at the three red boxes I have indicated in the image above, from right to left. So, first notice that this listing had a high bid amount of $81. Thatâs a LOT more than what I would expect to pay for Skullcandy earbuds. (F.Y.I. Skullcandy Inkâd earbuds are retailing on Target.com and BestBuy.com right now for about $18.) Thereâs also a pretty large jump between the highest bid and the next listing (a price difference of $60.48 to be exact). These two factors indicate that we may want to take a closer look at this listing because thereâs a pretty good chance that itâs an outlier. If we check out the title,
the high price is quickly explained. The reason this listing sold for
so much was because it was a lot of 18 sets of earbuds. So the mystery
is explained, but now we want it removed from our research results.
There are two ways we can do this. We can either click To
manually remove the listing, simply click the checkmark on the
left-hand side. Weâre going to filter this listing out of our results,
but before we hit When youâre checking for outliers itâs always a good practice to check out the listings titles around the high and low ends. For example in my report, when I was looking for high outliers, I found a couple of listings that were for two sets of earbuds. I need to exclude these listings as well. Now, letâs check the other side of our outlier spectrum. Simply click the High Bid column to sort in ascending order and you can check for an extreme low the same way we did for the high outlier (find the first listing that sold by checking the Total Sales column, determine if a price looks too low, check the title for listing in question, uncheck the box if you donât want it included). Once you removed
the checkmarks for all of the listings you want to exclude, click
And itâs that simple! I bet you never knew you could have so much power with your market research! Not only can you pick and choose your keywords to make sure youâre narrowing your search (with the aid of the Search Preview window of course!), but you can also quickly remove listings that slip past your keywords. No other research tool gives you the power to have such clean and accurate data! Now youâre ready to check a search for accuracy on your own. And donât forget to save your filtered report before you head off to the assignment (if you need help saving, check out Lesson 2). You can call this one Filtered Earbuds, and weâll use our filtered results to power up our listings in upcoming lessons! Assignment #3: Run a search for your own product and check the results for accuracy Now that you know how to do check for accuracy, you are no doubt dying to use your new-found skills on your own products. So, what are you waiting for? Perform a new search or use a saved report for one of your products, and check the results for any eBay listings that are contaminating your information. Use the Listings Window to discover any listings that need to be removed, and manually filter them out of your results. Notice the difference it makes! Get ready for the rest of our course by mastering these filtering techniques. In no time, it will take you less than a minute to get the results youâre looking for. CONGRATULATIONS! Youâve finished this session! Have questions? Our support team is standing by to assist you. Look for Lesson 4 in your inbox in a day or two. Or, if you can't wait, move forward to Lesson 4 right now. Or, return to Power to Profit Tutorial Home Page |
|||||

 Using misspelled words in your searches can
sometimes return some pretty interesting results. For example, I was
recently doing a search on the Webkinz plush toys. I ran two
searchesâone with Webkinz and one with Webkins (with an âsâ). There
were quite a few listings with the misspelled product name, and it was
interesting to compare those listings to the correctly spelled search.
If your product includes a keyword that is often misspelled by buyers
and sellers, you would be wise to run a search for both the correct
spelling and the misspelled word.
Using misspelled words in your searches can
sometimes return some pretty interesting results. For example, I was
recently doing a search on the Webkinz plush toys. I ran two
searchesâone with Webkinz and one with Webkins (with an âsâ). There
were quite a few listings with the misspelled product name, and it was
interesting to compare those listings to the correctly spelled search.
If your product includes a keyword that is often misspelled by buyers
and sellers, you would be wise to run a search for both the correct
spelling and the misspelled word.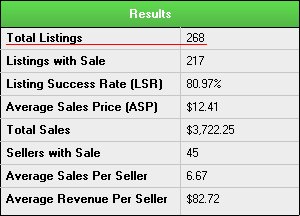
 , go back
to my search window, and increase the Number of
Auctions.
, go back
to my search window, and increase the Number of
Auctions.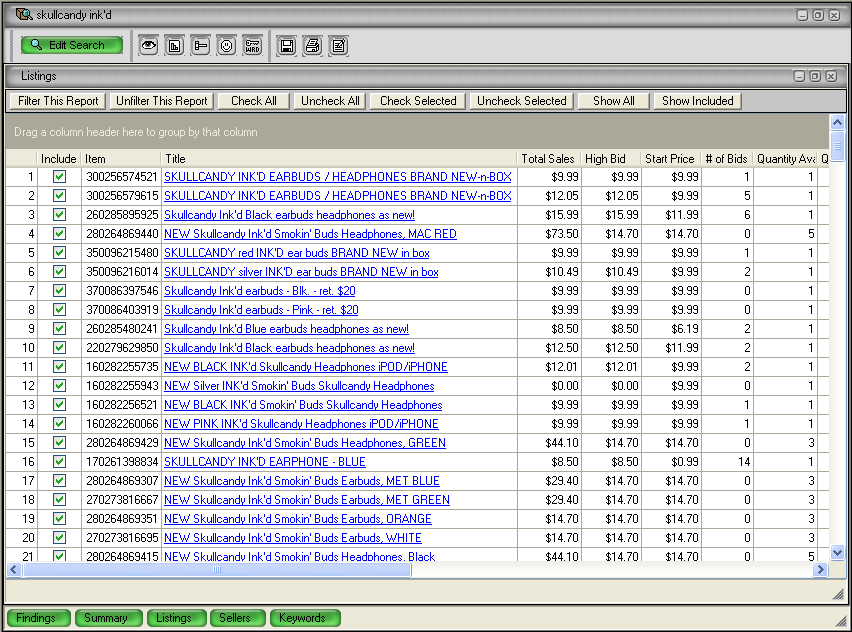

 , letâs
check and make sure weâve excluded all the listings we need
to.
, letâs
check and make sure weâve excluded all the listings we need
to.